text.skipToContent
text.skipToNavigation
Configure Product
Saved Configuration
View Configuration
Terms and Conditions
Saved Addresses
Something went wrong
Please validate your credit card and billing information.
Payment submission timed out. The server might be busy.
There was an error processing your request.
Please validate your credit card and billing information.
Please enter a card number
Please select a card type
Please enter a value for this field
Please enter first name
Please enter last name
Please enter a zipcode
Please enter an expiry month
Please enter an expiry year
Please enter an issue number
Please enter a start month
Please enter a start year
The card number is not valid
The card type is not supported
The card verification code is not valid
Zipcode is not valid
The expiry month is not valid
The expiry year is not valid
The issue number is not valid
The start month is not valid
The start year is not valid
This field is required
Errors were found with the address you provided. Please verify your address.
Date should be in MM/DD/YYYY format
Please enter valid values
Please enter future date
Please enter the shipping date
Shipment date is updated
Required Fields Missing or incorrect.
We're sorry, there was an issue with your credit card, please try another form of payment.
We're sorry, something went wrong on our side, please try again later or contact Customer Service.
We're sorry, something went wrong on our side, please contact Customer Service to avoid duplication.
Please confirm that you have entered the correct information for this credit card number.
We're sorry, there was an issue with your credit card, please contact your issuing bank.
This card is expired, please update the information or try another card.
We're sorry, there was an issue with your credit card, please try another form of payment.
We're sorry, we're having trouble contacting your bank. Please try again later.
We're sorry, there was an issue with your credit card, please try another form of payment.
Required Fields Missing or incorrect.
We're sorry, there was an issue with your credit card, please try another form of payment.
Please confirm that you have entered the correct information for this credit card number.
Required Fields Missing or incorrect
We're sorry, there was an issue with your credit card, please try another form of payment.
We're sorry, something went wrong on our side, please try again later or contact Customer Service.
We're sorry, we're having trouble contacting your bank. Please try again later.
Required Fields Missing or incorrect.
We're sorry, something went wrong on our side, please contact Customer Service to avoid duplication.
Home
Resources
Connecting Relays to a Digital Output Board and Noise Considerations
Published April 17, 2019
Mechanical relays are very noisy (electrically) and they can cause problems when connecting them to a PC digital I/O card, ranging from spikes on your analog measurements to computer lockups!
One must remember that relays consist of coils that are energized and de-energized, causing a set of contacts (or more) to open or close. Noise is generated from the collapsing magnetic field of the coil as well as arcing across the contacts.
The most common solution is to reduce the noise both across the coil AND across the contacts.
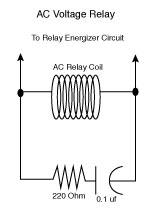
FOR AC VOLTAGE,
use a 220 Ohm resistor connected in series with a 0.1 uf capacitor, and then connect this circuit across the coil of the relay. It is best to do this as close to the relay as possible. Make sure that you select a capacitor that is rated for the AC voltage that you are using. An MOV (Metal Oxide Varistor) may also be used.
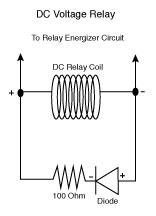
FOR DC VOLTAGE,
you would use a 1000 Ohm resistor in series with a diode (ie. IN4002) and put this circuit across the coil. Make sure that you put the diode + to the coil - (since you want to reverse the polarity)
Technical Learning
Technical Learning